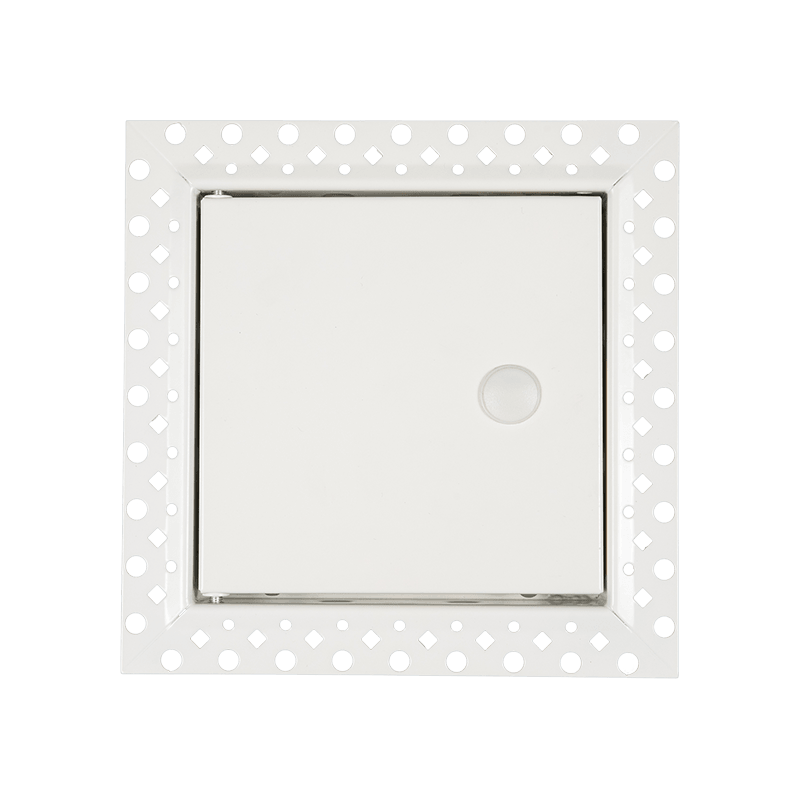
Summary:WHY ARE INSULATED ACCESS DOORS ESSENTIAL?
Insulated access doors provide access to essential areas like HVAC systems, plumbing, and electrical compon......
WHY ARE INSULATED ACCESS DOORS ESSENTIAL?
Insulated access doors provide access to essential areas like HVAC systems, plumbing, and electrical components while helping keep the building's temperature. This contributes to better energy efficiency and lower electricity costs.
STEPS FOR INSTALLING AN INSULATED ACCESS DOOR IN A COMMERCIAL SETTING
STEP #1: PLANNING AND PREPARATION
Effective planning is key to a successful installation. Start by choosing the right type of access door for your specific needs. Whether ceiling access doors, roof hatches, or fire-rated access doors, careful planning will help you select the right option.
Next, find good spot for the door, focusing on areas that need regular maintenance or inspection. Measure the opening carefully, considering the thicker size of the insulated access doors. Double-check that the height and width match the door’s size.
STEP #2: GATHERING THE TOOLS AND MATERIALS
Preparing tools and materials in advance reduces safety risks and saves time. Having everything you need before starting the project helps ensure things run smoothly and efficiently.
Here are some of the essential items needed:
Measuring Tape: Use it to measure the dimensions of the opening and verify that the door will fit correctly.
Pencil or Marker: To guide your work, mark the measurement points and installation locations on the wall or ceiling.
Level: Check that the access door is installed evenly and aligned correctly for functionality and appearance.
Stud Finder: Look for the studs behind the wall or ceiling to attach the door securely.
Saw: Cut the opening or trim the door if adjustments are needed, using the proper saw for the material.
Drill and Drill Bits: Create holes for screws or fasteners, ensuring you use the correct size and type for the installation surface.
Screws or Fasteners: Securely attach the access door with the right size and type based on the door and surface material.
Caulk or Sealant: Apply around the door to seal gaps, improve insulation, and provide a clean finish.
STEP #3: MARKING THE INSTALLATION AREA
When installing the door on a wall, use a stud finder to locate and mark any studs, guiding where to drill or cut. Ensure the outline is level, as a crooked access door can appear unprofessional and cause sealing issues.
STEP #4: CUTTING THE OPENING
Cut along the marked outline with a saw suited to the material to create an opening for the access door. When working with walls, avoid cutting into any hidden electrical wiring or plumbing behind the surface.
Having an assistant is a good idea when working on ceilings, especially if the access door is large or will be installed at a considerable height. Prioritizing safety and accuracy during cutting will help ensure a smooth and secure installation.
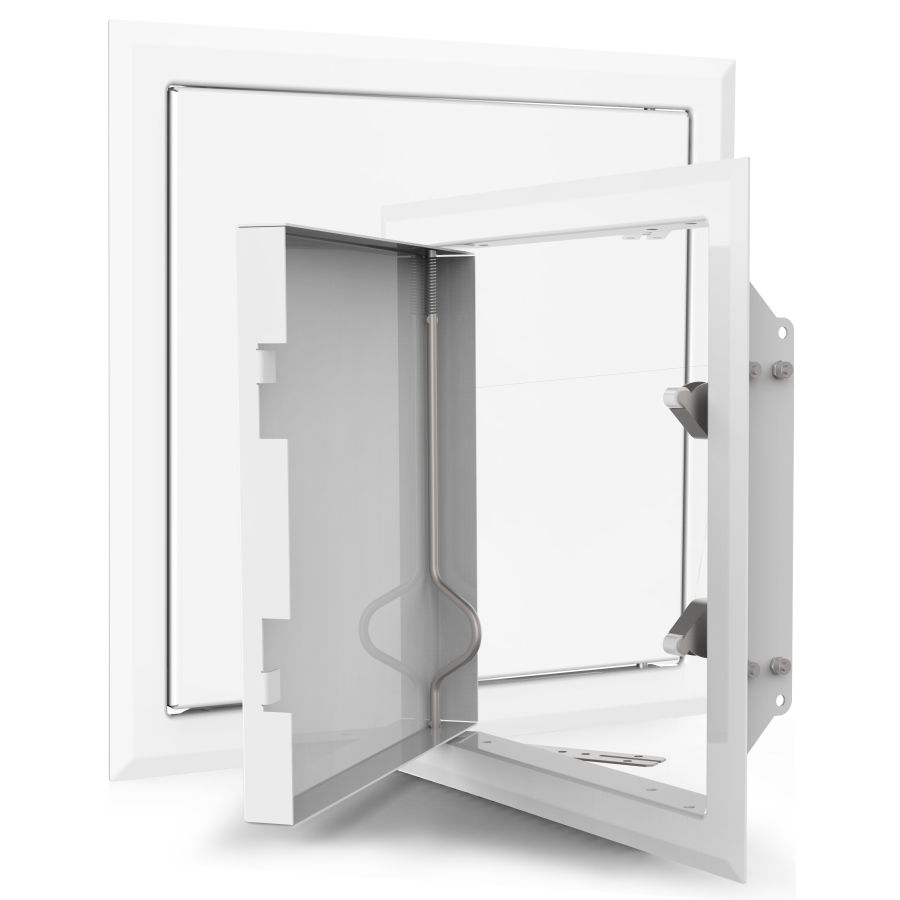
STEP #5: INSTALLING THE INSULATED ACCESS DOOR
Position the new insulated access door carefully into the prepared opening, guaranteeing it’s centered and aligned with the edges. Begin securing the door frame with screws from the top and work downward to keep it level and aligned.
Once the frame is secured, use a level to check alignment and adjust as needed to remove gaps or misalignment. Inspect the hinges to see if they stick or don’t close properly.
STEP #6: CARRYING OUT FINAL INSPECTIONS AND TOUCH-UPS
Once the door is fully installed and sealed, take the time to inspect it carefully. Confirm that the door is level, and the seal is tight with no gaps. Open and close the door several times to verify smooth movement.
Check the door’s surface for scratches or marks from installation and touch up any imperfections with matching paint or finish as needed.
Finally, clean away debris, dust, or construction materials from the door and surrounding area. This will reveal the door’s true condition and ensure no remains affect its performance.
 English
 简体中文
简体中文 France
 España
 العربية